> ## Documentation Index
> Fetch the complete documentation index at: https://docs.agentaos.ai/llms.txt
> Use this file to discover all available pages before exploring further.
# Go Live
> Move from test mode to real money: verify your business, add a payout account, and swap your test key for a live one.
By the end of this guide your account is verified, has somewhere to send money, and is running on a live API key instead of a test one. Test mode and live are fully separate environments in AgentaOS, nothing you built carries over automatically, only your code does, so this is a short, deliberate switch, not a background setting.
## Before you start
* You've already tested your integration end to end in test mode: checkout creation, webhook delivery, and (if you're selling recurring plans) subscription creation. See [Accept your first payment](/guides/accept-your-first-payment) and [Sell a subscription](/guides/sell-a-subscription) if you haven't.
* Your real business details on hand: legal name, address, and whatever your business verification asks for.
Confirm the basics work with test data before you touch real money: a checkout completes, your webhook handler verifies the signature and fulfills correctly, and (if relevant) a subscription activates and cancels the way you expect. Test mode is free and has no verification gate, so there's no reason to skip this.
The sidebar's **Go live** item is your durable readiness tracker, with a progress chip showing what's left. It stays visible until every step below is done, and it's the fastest way to see what's blocking you.
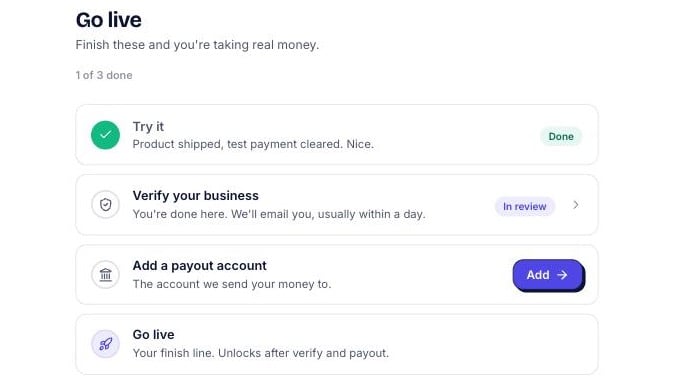 AgentaOS is the Merchant of Record on every live transaction, we need to know who we're selling on behalf of before real money moves. Submit your business details for review from the **Go live** page.
See [Account review](/mor/account-review) for what we check and how to prepare. Reviews are usually completed within a day.
You need somewhere for your balance to go. Set up bank, wallet, or both.
Add a bank account to receive payouts in EUR or USD across the supported countries. See [Supported countries](/mor/supported-countries).
Have a wallet address you control ready to receive stablecoin payouts. No separate institution or verification is required for this path, since you're moving your own balance to your own address.
See [Payouts](/payouts/overview) for how your balance moves through **Incoming**, **Available**, and **In reserve** before it pays out.
Once verification is approved, flip the Test/Live switch at the top of the dashboard sidebar to **Live**, then generate a new key from **Settings → Developers → API Keys**. Live keys are prefixed `sk_live_`.
```typescript theme={null}
const agentaos = new AgentaOS(process.env.AGENTAOS_API_KEY!); // now sk_live_...
```
The SDK detects the environment from the key's prefix automatically, there's no separate flag to flip. Swap the environment variable in your deploy, and every call now reads and writes live data.
Update `successUrl`, `cancelUrl`, and `webhookUrl` on your live checkouts and payment links to your real domain, not `localhost` or a tunnel URL left over from testing. Then check **Developer → Webhooks** while the dashboard is switched to Live, and confirm your production endpoint and signing secret are set. See [Handle webhooks](/guides/handle-webhooks) if you haven't wired this up yet.
## Verify it worked
* The **Go live** progress chip in the sidebar shows every step complete.
* **Settings → Developers → API Keys** shows an active `sk_live_` key, and your server is using it.
* Your payout destination (bank IBAN or wallet address) appears on the **Payouts** page.
* Optionally, run one small real checkout end to end: create it with your live key, pay it with a real card, and confirm it lands in **Finance → Payments** with an invoice under **Finance → Invoices**. Unlike test mode, live mode doesn't accept the `4242...` test card, only real payment methods clear.
## Go-live checklist
* [ ] Test-mode integration tested end to end (checkout, webhook, subscriptions if used)
* [ ] Business verification (KYB) submitted and approved
* [ ] Payout account added: bank IBAN, wallet address, or both
* [ ] Live API key (`sk_live_...`) generated and deployed
* [ ] `successUrl` / `cancelUrl` / `webhookUrl` point at production, not localhost
* [ ] Live webhook endpoint and signing secret confirmed in **Developer → Webhooks**
## Next steps
How test and live keys differ, in depth.
Why verification exists and what it unlocks.
How your balance clears and moves to your payout destination.
Make sure your production endpoint is verified and ready before you flip the switch.
AgentaOS is the Merchant of Record on every live transaction, we need to know who we're selling on behalf of before real money moves. Submit your business details for review from the **Go live** page.
See [Account review](/mor/account-review) for what we check and how to prepare. Reviews are usually completed within a day.
You need somewhere for your balance to go. Set up bank, wallet, or both.
Add a bank account to receive payouts in EUR or USD across the supported countries. See [Supported countries](/mor/supported-countries).
Have a wallet address you control ready to receive stablecoin payouts. No separate institution or verification is required for this path, since you're moving your own balance to your own address.
See [Payouts](/payouts/overview) for how your balance moves through **Incoming**, **Available**, and **In reserve** before it pays out.
Once verification is approved, flip the Test/Live switch at the top of the dashboard sidebar to **Live**, then generate a new key from **Settings → Developers → API Keys**. Live keys are prefixed `sk_live_`.
```typescript theme={null}
const agentaos = new AgentaOS(process.env.AGENTAOS_API_KEY!); // now sk_live_...
```
The SDK detects the environment from the key's prefix automatically, there's no separate flag to flip. Swap the environment variable in your deploy, and every call now reads and writes live data.
Update `successUrl`, `cancelUrl`, and `webhookUrl` on your live checkouts and payment links to your real domain, not `localhost` or a tunnel URL left over from testing. Then check **Developer → Webhooks** while the dashboard is switched to Live, and confirm your production endpoint and signing secret are set. See [Handle webhooks](/guides/handle-webhooks) if you haven't wired this up yet.
## Verify it worked
* The **Go live** progress chip in the sidebar shows every step complete.
* **Settings → Developers → API Keys** shows an active `sk_live_` key, and your server is using it.
* Your payout destination (bank IBAN or wallet address) appears on the **Payouts** page.
* Optionally, run one small real checkout end to end: create it with your live key, pay it with a real card, and confirm it lands in **Finance → Payments** with an invoice under **Finance → Invoices**. Unlike test mode, live mode doesn't accept the `4242...` test card, only real payment methods clear.
## Go-live checklist
* [ ] Test-mode integration tested end to end (checkout, webhook, subscriptions if used)
* [ ] Business verification (KYB) submitted and approved
* [ ] Payout account added: bank IBAN, wallet address, or both
* [ ] Live API key (`sk_live_...`) generated and deployed
* [ ] `successUrl` / `cancelUrl` / `webhookUrl` point at production, not localhost
* [ ] Live webhook endpoint and signing secret confirmed in **Developer → Webhooks**
## Next steps
How test and live keys differ, in depth.
Why verification exists and what it unlocks.
How your balance clears and moves to your payout destination.
Make sure your production endpoint is verified and ready before you flip the switch.