> ## Documentation Index
> Fetch the complete documentation index at: https://docs.agentaos.ai/llms.txt
> Use this file to discover all available pages before exploring further.
# Build a platform
> Run your clients' businesses from one AgentaOS account. Add a business, invite the client, get it verified, set your share, and let it sell. Dashboard first, code second.
Private preview Working end to end for the accounts that use it; details can still change. Tell us at [contact@agentaos.ai](mailto:contact@agentaos.ai) before you rely on it, and we support you directly. See [Product release phases](/getting-started/release-phases).
A platform is an AgentaOS account that manages other businesses. An agency that launches products for clients is a platform. So is a studio with three apps of its own.
Each business you manage gets its own name on the checkout, its own invoices, and its own bank account and payouts. You run all of them from your account, and you can take a share of every sale a client makes. AgentaOS is the merchant of record for every sale, yours and theirs.
Tell us first; nothing needs switching on in the dashboard.
New to platforms? [Platforms](/connect/overview) explains the two kinds of business and who does what.
## In the dashboard
You need an AgentaOS account. Every step below works in test mode, including the **ID check link** button.
Open **Settings → Business**, scroll to **Businesses you manage**, and click **Add a business**.
Enter the brand name buyers will see and the country where the business is registered. Then answer **Who is it?**
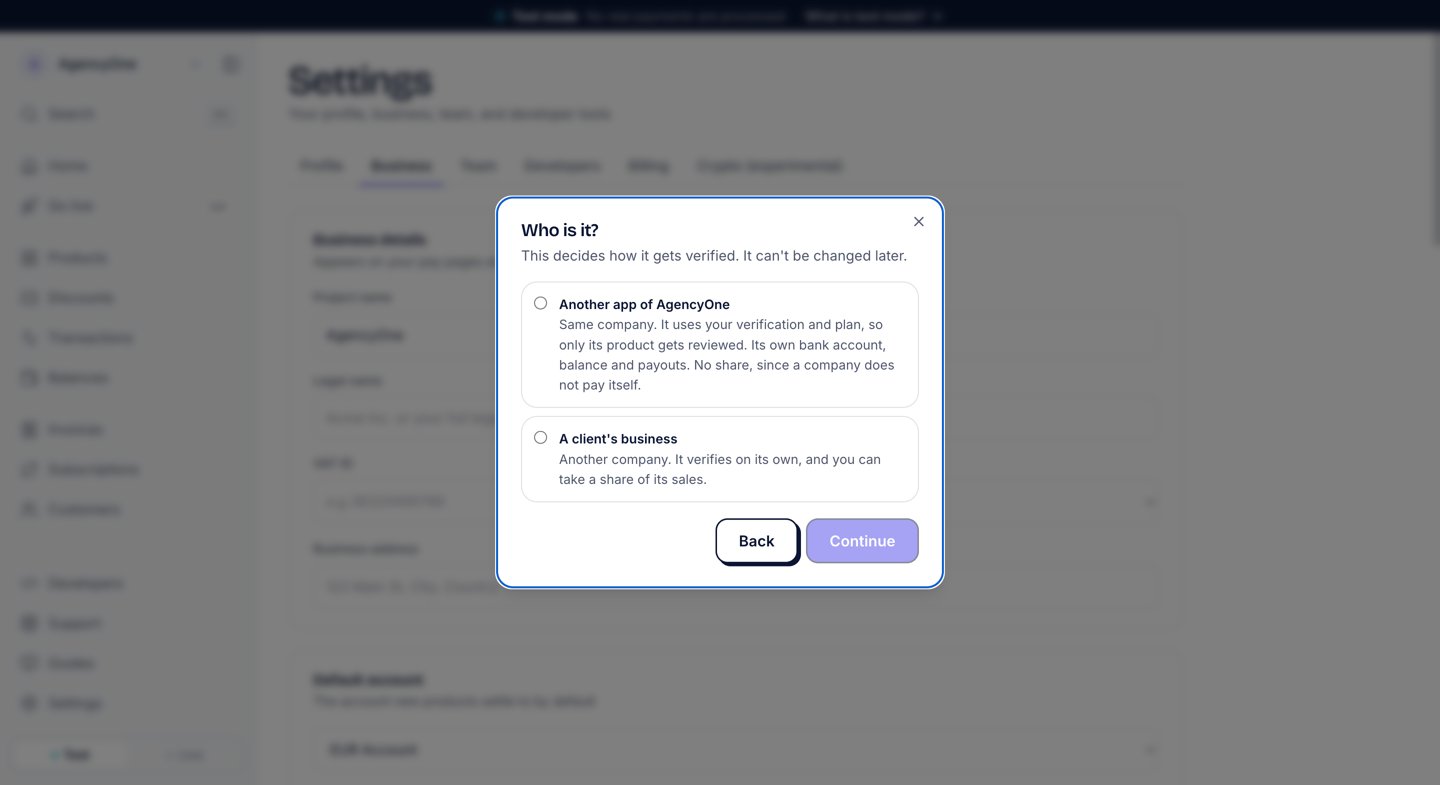 * **A client's business** is another company. It verifies on its own, and you can take a share of its sales.
* **Another app of your own company** is the same company. It uses your verification and your plan, so only its product gets reviewed. It has its own bank account, balance and payouts. It carries no share, because a company does not pay itself.
The dialog asks **Who runs it?**
Leave the email empty to run the business yourself. Most clients never log in.
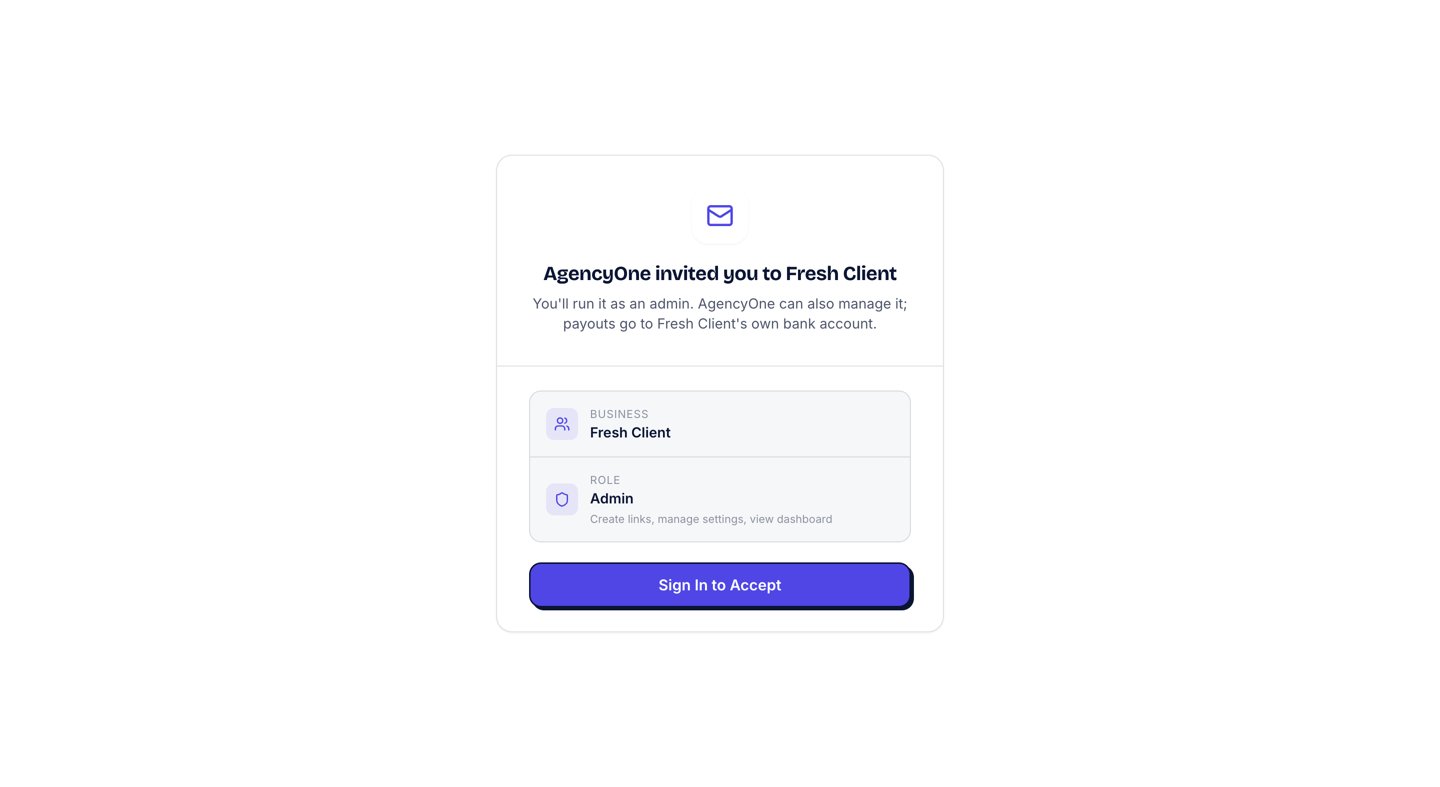
Enter your client's email to give them their own login. They become an admin of this business and see only this business. We email them the invitation. The dialog also shows you the link, so you can send it yourself. The link signs them in and stays valid for 7 days.
* **A client's business** is another company. It verifies on its own, and you can take a share of its sales.
* **Another app of your own company** is the same company. It uses your verification and your plan, so only its product gets reviewed. It has its own bank account, balance and payouts. It carries no share, because a company does not pay itself.
The dialog asks **Who runs it?**
Leave the email empty to run the business yourself. Most clients never log in.
Enter your client's email to give them their own login. They become an admin of this business and see only this business. We email them the invitation. The dialog also shows you the link, so you can send it yourself. The link signs them in and stays valid for 7 days.
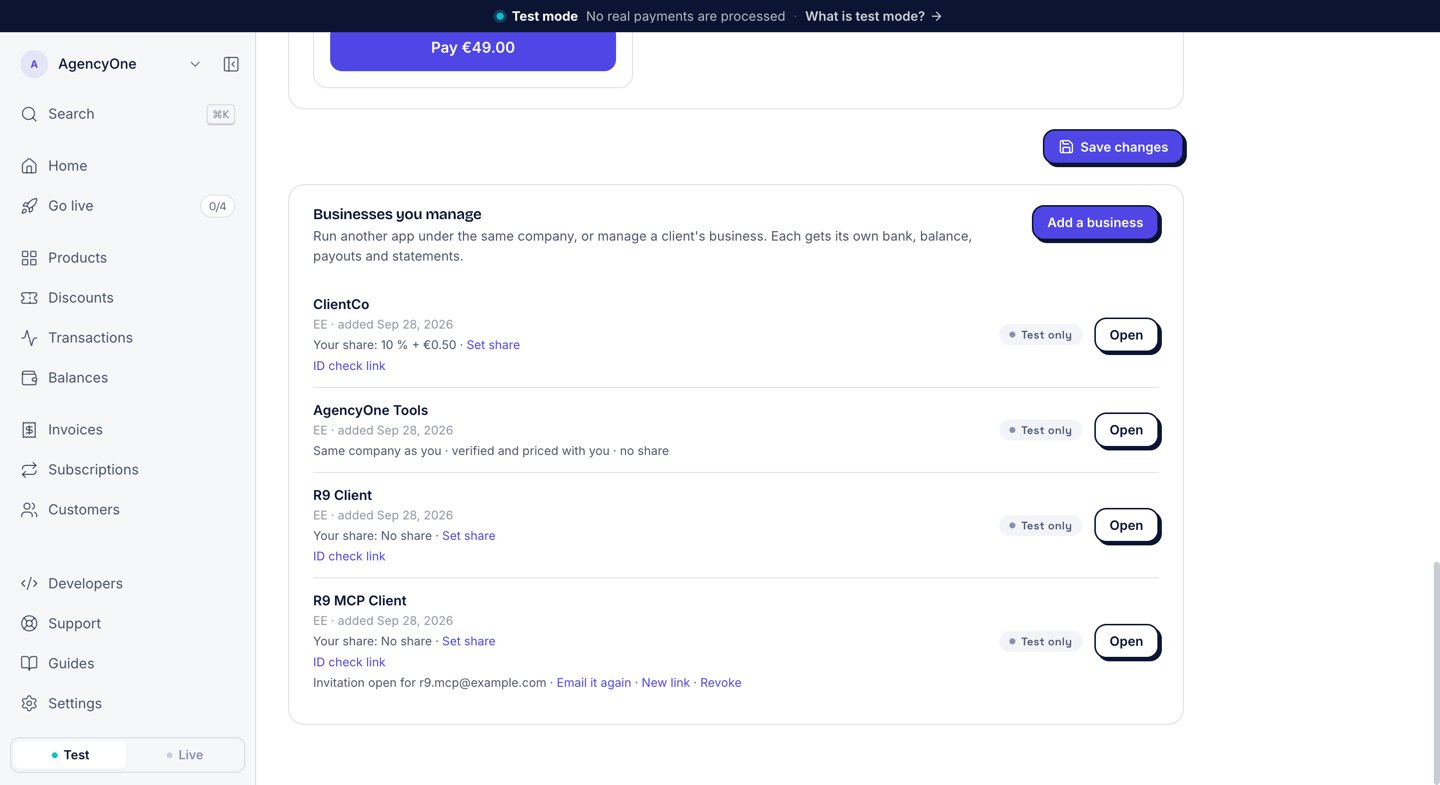 Until the client joins, the business's row shows **Invitation open for** their email, with **Email it again**, **New link** and **Revoke**.
The invitation link opens a page that names you and the business:
Until the client joins, the business's row shows **Invitation open for** their email, with **Email it again**, **New link** and **Revoke**.
The invitation link opens a page that names you and the business:
 After they accept, they land inside their business. Every page of theirs carries the line **Managed by AgencyOne. They can manage products and settings; payouts always go to ClientCo's own bank account.**
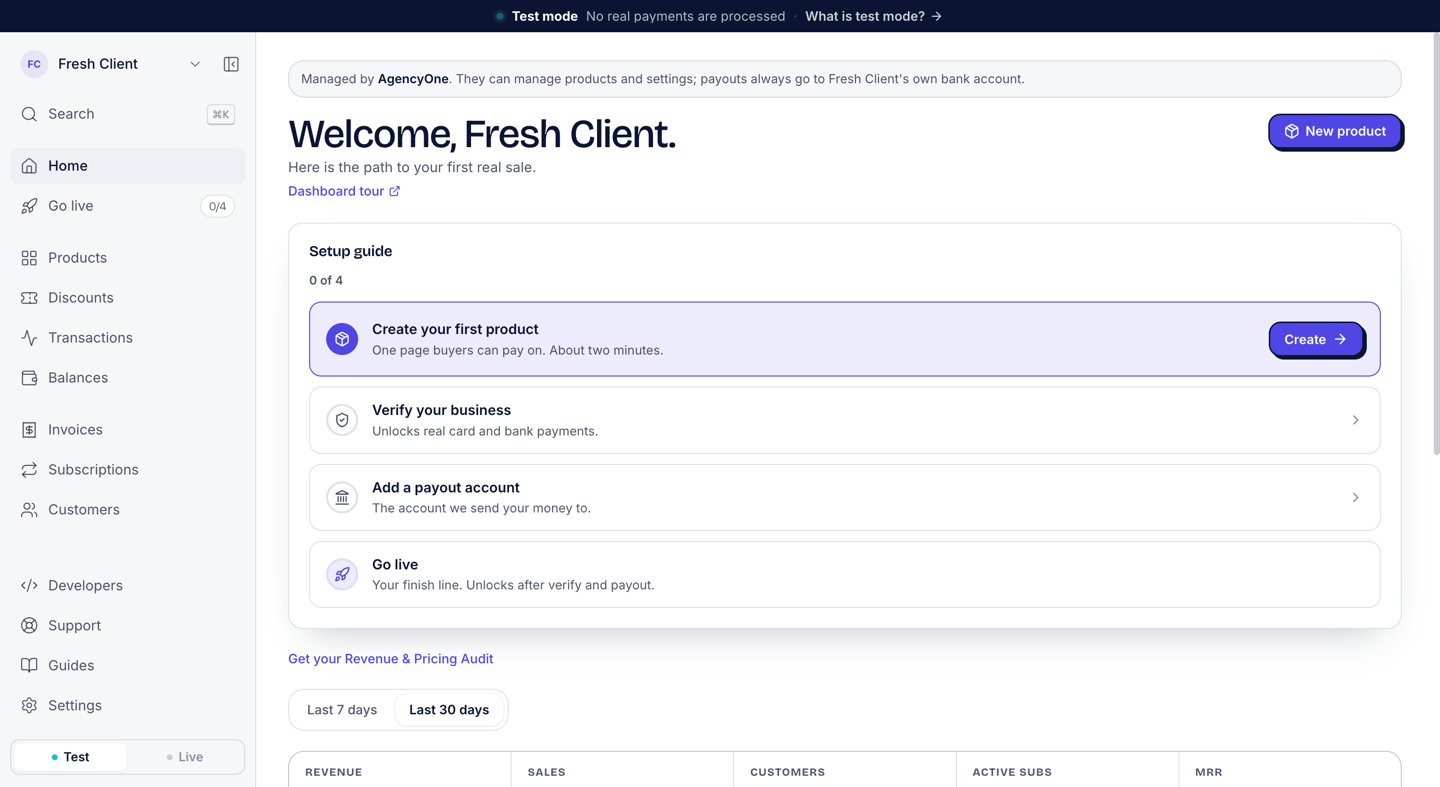 From here the client works like any AgentaOS merchant: products, sales, invoices, and their own bank account.
A business sells in test mode until its verification is approved and it has a payout account. After that, real money flows.
Verification has two parts:
* Your client files the business details, the product and the declarations from **Go live** in their dashboard. You can also file them for the client, from what the client confirmed to you, and our reviewers see that you filed them.
* Only the client can complete the identity check. Click **ID check link** on the business's row and send the link to the client.
Another app of your own company skips both parts. It is verified with you, and only its product is reviewed.
The row shows the status: **Test only**, **In review**, **Changes needed**, **On hold**, **Rejected** or **Live**. If you use webhooks, an `account.updated` event tells you when the status changes. See [Business status](/sdk/pay-businesses#business-status) for how the three sets of names match.
On a client's row, click **Set share**. The share is a percentage of each sale's price before VAT, plus a fixed amount per sale. The screen shows the outcome as you type.
From here the client works like any AgentaOS merchant: products, sales, invoices, and their own bank account.
A business sells in test mode until its verification is approved and it has a payout account. After that, real money flows.
Verification has two parts:
* Your client files the business details, the product and the declarations from **Go live** in their dashboard. You can also file them for the client, from what the client confirmed to you, and our reviewers see that you filed them.
* Only the client can complete the identity check. Click **ID check link** on the business's row and send the link to the client.
Another app of your own company skips both parts. It is verified with you, and only its product is reviewed.
The row shows the status: **Test only**, **In review**, **Changes needed**, **On hold**, **Rejected** or **Live**. If you use webhooks, an `account.updated` event tells you when the status changes. See [Business status](/sdk/pay-businesses#business-status) for how the three sets of names match.
On a client's row, click **Set share**. The share is a percentage of each sale's price before VAT, plus a fixed amount per sale. The screen shows the outcome as you type.
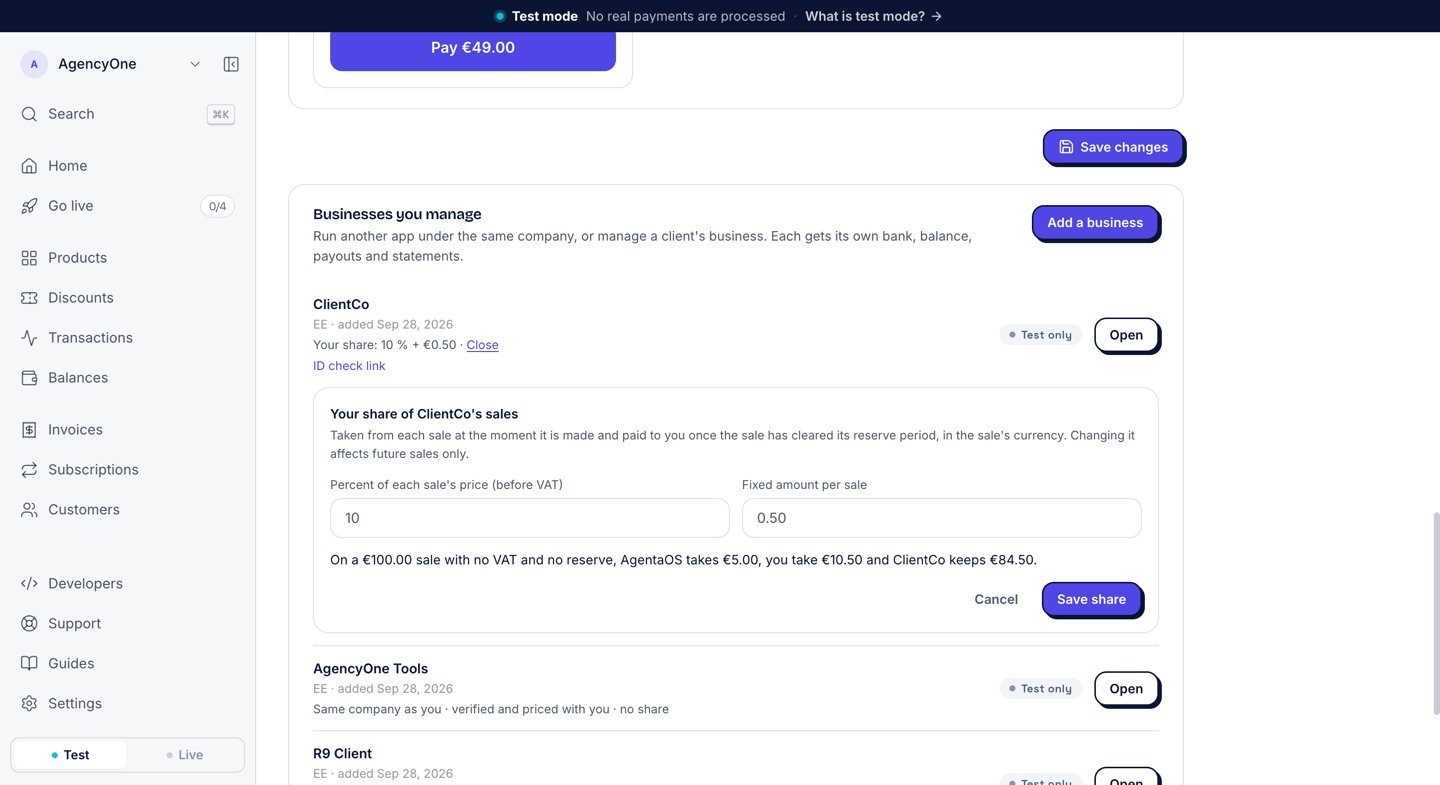 The share is fixed on each sale at the moment of the sale. A change applies to future sales only. Your client sees the share on every sale as **Platform fee**, before their net.
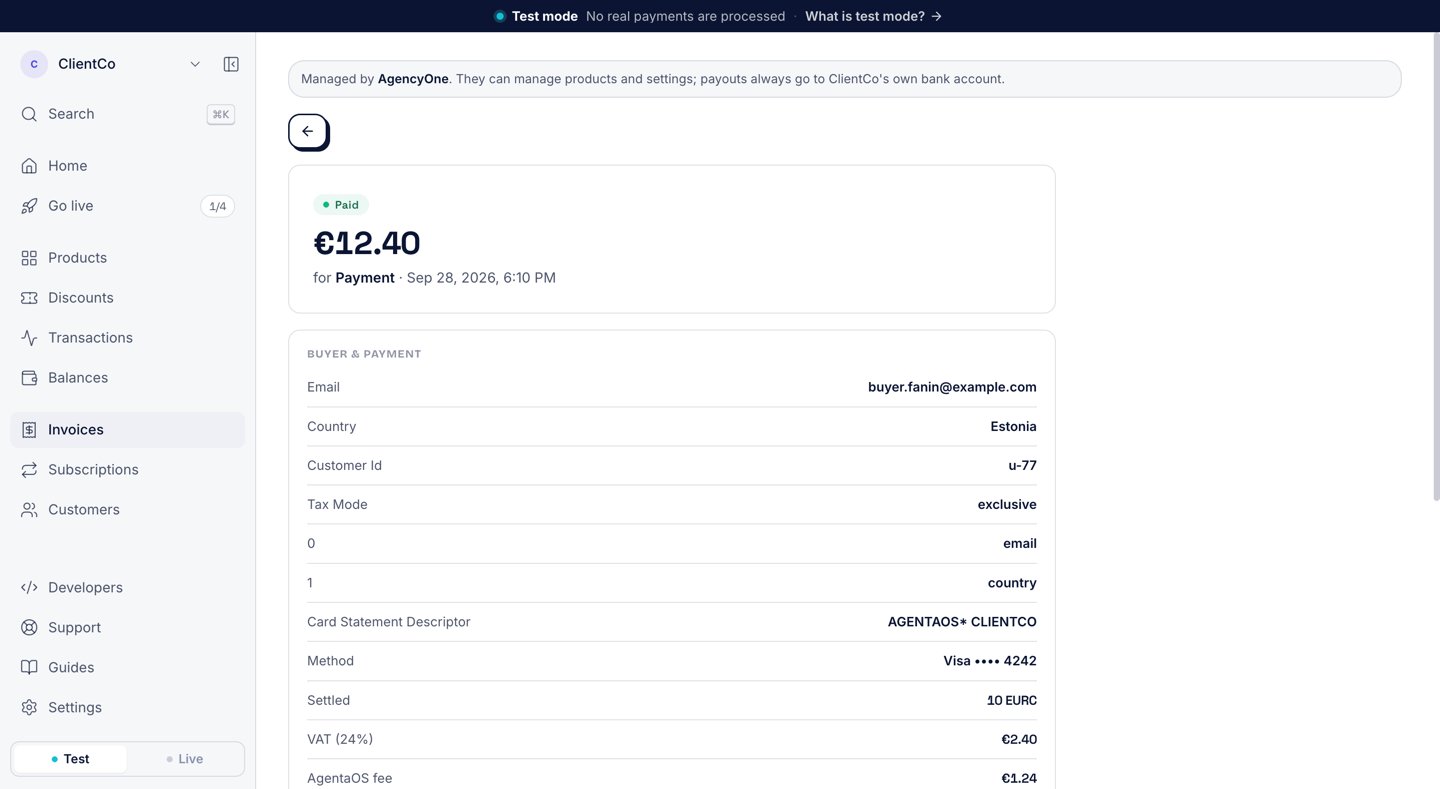 See [Platform fees](/connect/fees) for the rules.
Click **Open** on a row. Your dashboard switches into that business, and the banner reads **You're working in ClientCo · managed by AgencyOne**. Everything you create there belongs to the client: products, checkouts, invoices, customers. Click **Back** to return to your own account.
Your fees appear on your own **Balances** page, in the **Overview** tab, in the **Platform fees** card. The card shows the total not yet paid to you, then **When you get it**: one line per day for the next five days, soonest first, then one **Later** line.
See [Platform fees](/connect/fees) for the rules.
Click **Open** on a row. Your dashboard switches into that business, and the banner reads **You're working in ClientCo · managed by AgencyOne**. Everything you create there belongs to the client: products, checkouts, invoices, customers. Click **Back** to return to your own account.
Your fees appear on your own **Balances** page, in the **Overview** tab, in the **Platform fees** card. The card shows the total not yet paid to you, then **When you get it**: one line per day for the next five days, soonest first, then one **Later** line.
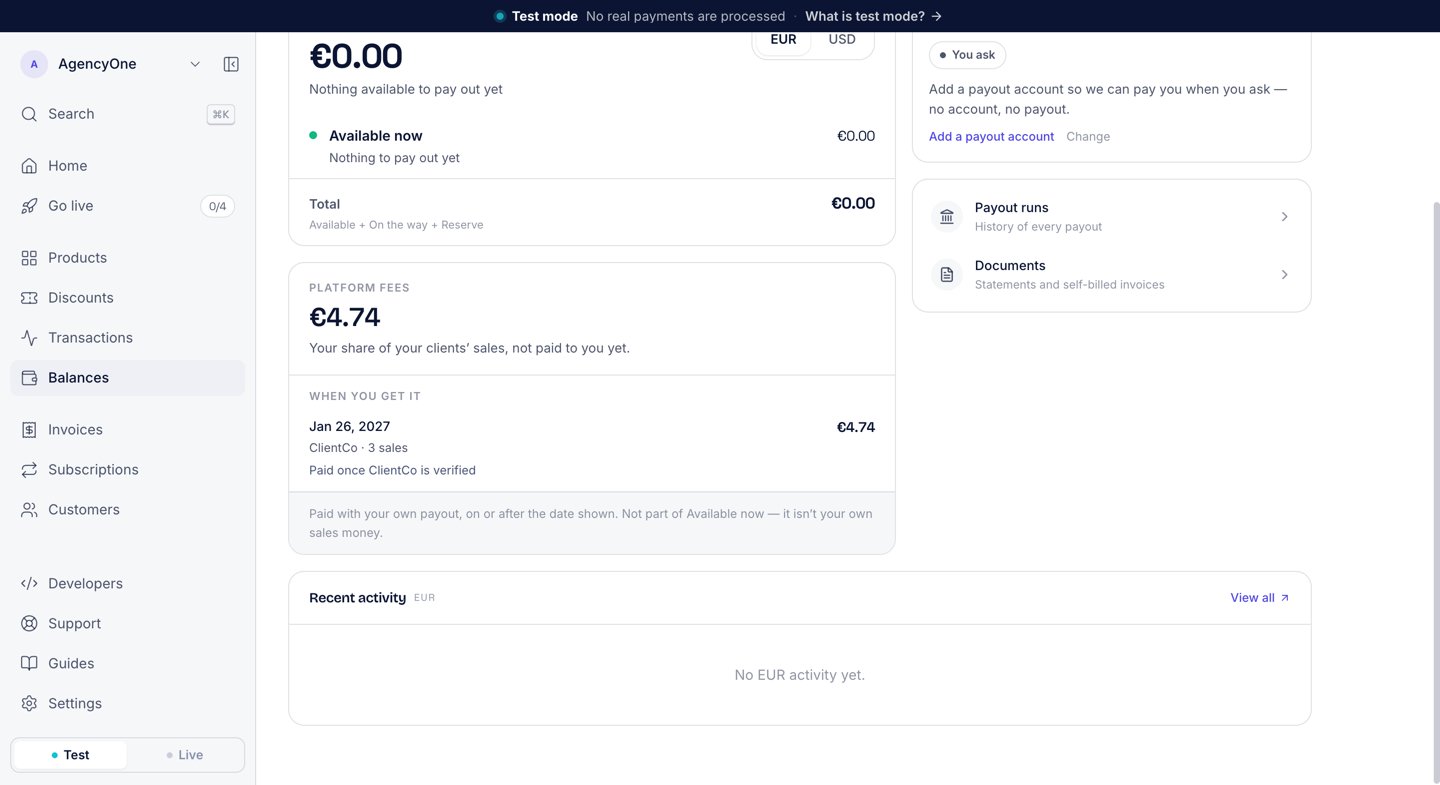 We pay the fees with your own payout, on or after the date shown. They are never part of **Available now**, because they are not your own sales money.
## From code
Every step above is also an API call or a CLI command, made with your own key. To add clients from your own product, use these pages:
* [Businesses in the SDK](/sdk/pay-businesses): create a business, file its verification, send the identity check link, sell as the business, and receive every business's events on one webhook.
* [Businesses in the CLI](/cli/businesses): the same steps from the terminal, with `--business` on every command.
* [Platform webhooks](/connect/webhooks): the `business` field on every event, and `account.updated`.
## Next steps
Your share and when we pay it.
Put the checkout on your client's own page.
Every method and field.
The six commands and `--business`.
We pay the fees with your own payout, on or after the date shown. They are never part of **Available now**, because they are not your own sales money.
## From code
Every step above is also an API call or a CLI command, made with your own key. To add clients from your own product, use these pages:
* [Businesses in the SDK](/sdk/pay-businesses): create a business, file its verification, send the identity check link, sell as the business, and receive every business's events on one webhook.
* [Businesses in the CLI](/cli/businesses): the same steps from the terminal, with `--business` on every command.
* [Platform webhooks](/connect/webhooks): the `business` field on every event, and `account.updated`.
## Next steps
Your share and when we pay it.
Put the checkout on your client's own page.
Every method and field.
The six commands and `--business`.