> ## Documentation Index
> Fetch the complete documentation index at: https://docs.agentaos.ai/llms.txt
> Use this file to discover all available pages before exploring further.
# Accept Your First Payment
> Create a product, share its link, and watch a test payment land. No code required.
By the end of this guide you'll have a shareable payment link, a completed test payment against it, and a confirmed record in your dashboard. Every step runs in **test mode**: test money, no real card, nothing to lose.
You can do all of this from the dashboard. No code required. If you'd rather create links and detect payments programmatically, jump to [Do it in code](#do-it-in-code).
All you need is an AgentaOS account. Sign up at [app.agentaos.ai](https://app.agentaos.ai), no card required.
## From the dashboard
Open **Catalog → Products** and click **New product**. Give it a name and a price (for example, `Pro plan`, `49.00`), choose **one-time** or **subscription**, and save. Amounts are plain currency units: `49.00` means €49.00, never cents.
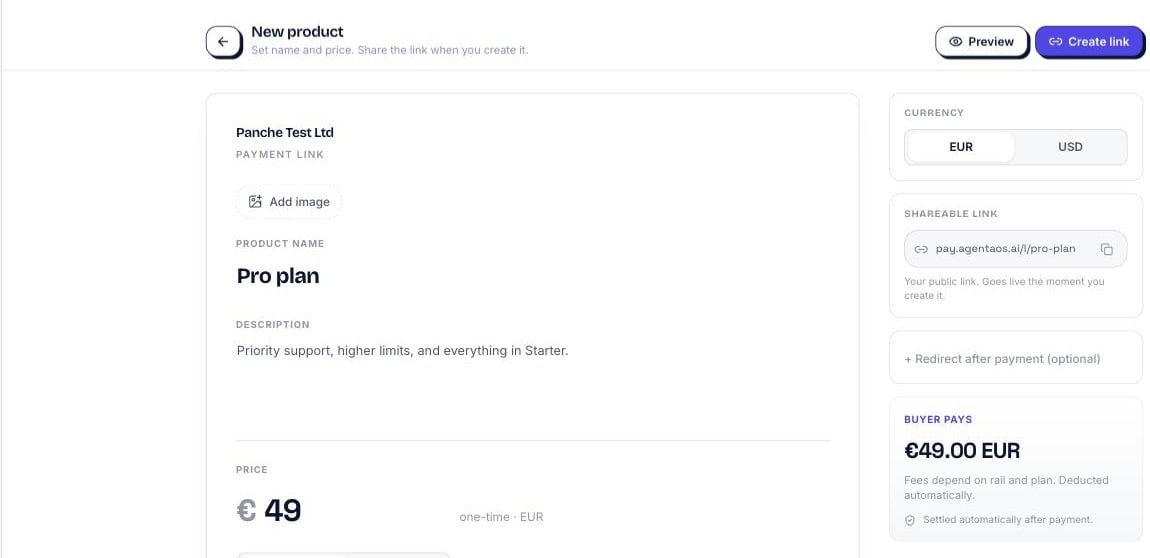 The moment you save, the product gets its own reusable payment link and a QR code.
On the product page, click **Copy link**. It looks like `https://app.agentaos.ai/pay/{id}`. Paste it anywhere: a button, an email, a chat message, an invoice, or share the QR code. Every visitor who opens it gets their own checkout, and there's nothing for the buyer to install.
Open the link in a browser. This is the page your buyer sees. AgentaOS is the merchant of record, so the checkout collects the buyer's country, calculates the right VAT, and shows one clear total before payment.
The moment you save, the product gets its own reusable payment link and a QR code.
On the product page, click **Copy link**. It looks like `https://app.agentaos.ai/pay/{id}`. Paste it anywhere: a button, an email, a chat message, an invoice, or share the QR code. Every visitor who opens it gets their own checkout, and there's nothing for the buyer to install.
Open the link in a browser. This is the page your buyer sees. AgentaOS is the merchant of record, so the checkout collects the buyer's country, calculates the right VAT, and shows one clear total before payment.
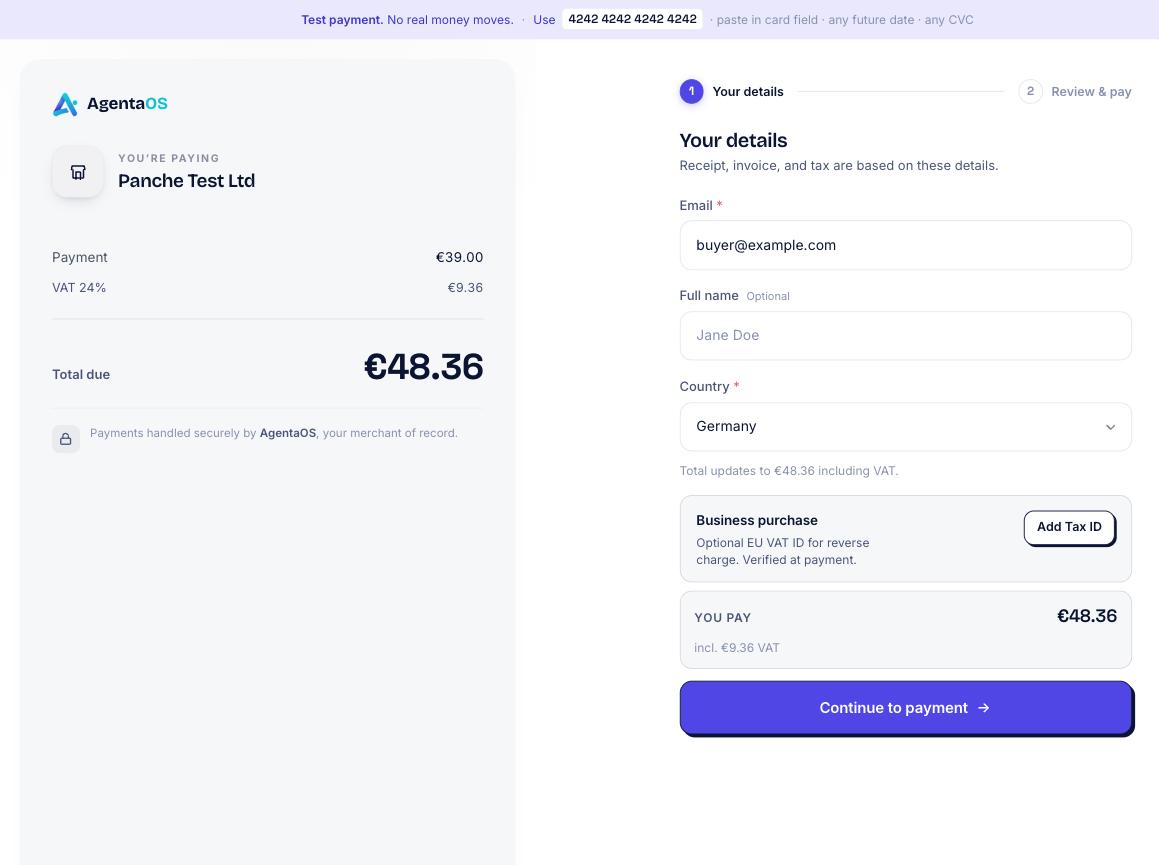 In test mode, the checkout renders the real secure card form, not a mock. Pay with the standard test card:
| Field | Value |
| ----------- | --------------------- |
| Card number | `4242 4242 4242 4242` |
| Expiry | Any future date |
| CVC | Any 3 digits |
Type the test card directly into the checkout page. Never send a card number to any AgentaOS API call yourself, in test mode or in live. We (and our card processor) never accept a raw card number over the API.
Open [app.agentaos.ai](https://app.agentaos.ai) → **Home** or **Finance → Payments**. Your test payment shows up in the balance and the activity feed within seconds. A tax-correct invoice appears under **Finance → Invoices**, and a customer record is created for the email that paid.
## What you just built
That one payment created a customer, a transaction, and a tax-correct invoice, all visible in the dashboard. No code, no integration, no card data touching your systems.
## Do it in code
The dashboard is enough to get paid. Reach for the API when you want to **create links or checkouts programmatically**, or **detect a payment from your own system** (fulfil an order, provision access, update your database) the moment it clears. Everything the dashboard does is available over the SDK, CLI, and REST API.
```bash theme={null}
npm install @agentaos/pay
```
`@agentaos/pay` is server-side only (Node.js 20+, ESM). Never ship your API key to a browser. Grab a test key (`sk_test_...`) from **Settings → Developers → API Keys**.
```bash Install theme={null}
curl -fsSL https://agentaos.ai/install | bash
```
```bash Log in theme={null}
agenta login
```
`agenta login` opens your browser to sign in, no API key needed. See [Login](/cli/login) for the details.
A payment link is a reusable, shareable URL. Every visitor who opens it gets their own checkout. Amounts are plain currency units: `49.99` means €49.99, never cents.
```typescript theme={null}
import { AgentaOS } from '@agentaos/pay';
const agentaos = new AgentaOS(process.env.AGENTAOS_API_KEY!); // sk_test_...
const link = await agentaos.paymentLinks.create({
amount: 49.99,
currency: 'EUR',
description: 'Pro plan',
successUrl: 'https://myshop.com/success',
webhookUrl: 'https://myshop.com/webhooks',
});
console.log(link.checkoutUrl);
// → https://app.agentaos.ai/pay/7rr6S9ml4BMp829wV5WeAA
```
```bash theme={null}
curl -X POST https://api.agentaos.ai/api/v1/gateway/payment-links \
-H "x-api-key: sk_test_..." \
-H "Content-Type: application/json" \
-d '{
"amount": 49.99,
"currency": "EUR",
"description": "Pro plan",
"successUrl": "https://myshop.com/success",
"webhookUrl": "https://myshop.com/webhooks"
}'
```
```bash theme={null}
agenta pay checkout -a 49.99 -c EUR -d "Pro plan" --json
```
There's no CLI command to create a reusable payment link yet. `agenta pay checkout` creates a one-off checkout instead. To create a real reusable link, use the SDK, the REST API, or the dashboard's **Catalog → Products** page.
Share the `checkoutUrl` exactly as you'd share a link from the dashboard. The buyer's checkout page is identical.
If you set a `webhookUrl`, AgentaOS POSTs a `checkout.session.completed` event the moment payment clears, with `sessionId`, `amount` (a string, `"49.99"`), and `currency` in the payload. This is the reliable way to react to a payment server-side. See [Handle webhooks](/guides/handle-webhooks) to build a verified handler.
Poll the checkout with `checkouts.retrieve()` (SDK), `agenta pay get ` (CLI), or a `GET` against the REST API. It moves from `open` to `completed` when the payment clears.
Don't trust the `successUrl` redirect as proof of payment. The buyer's browser might close before it fires. A webhook or a status check against the checkout is the source of truth.
## Next steps
Turn this into a recurring plan buyers pay into every month or year.
Build a verified handler so your server reacts to payments automatically.
Move from test mode to accepting real money.
Every parameter, response field, and the checkout-fields feature, in full.
In test mode, the checkout renders the real secure card form, not a mock. Pay with the standard test card:
| Field | Value |
| ----------- | --------------------- |
| Card number | `4242 4242 4242 4242` |
| Expiry | Any future date |
| CVC | Any 3 digits |
Type the test card directly into the checkout page. Never send a card number to any AgentaOS API call yourself, in test mode or in live. We (and our card processor) never accept a raw card number over the API.
Open [app.agentaos.ai](https://app.agentaos.ai) → **Home** or **Finance → Payments**. Your test payment shows up in the balance and the activity feed within seconds. A tax-correct invoice appears under **Finance → Invoices**, and a customer record is created for the email that paid.
## What you just built
That one payment created a customer, a transaction, and a tax-correct invoice, all visible in the dashboard. No code, no integration, no card data touching your systems.
## Do it in code
The dashboard is enough to get paid. Reach for the API when you want to **create links or checkouts programmatically**, or **detect a payment from your own system** (fulfil an order, provision access, update your database) the moment it clears. Everything the dashboard does is available over the SDK, CLI, and REST API.
```bash theme={null}
npm install @agentaos/pay
```
`@agentaos/pay` is server-side only (Node.js 20+, ESM). Never ship your API key to a browser. Grab a test key (`sk_test_...`) from **Settings → Developers → API Keys**.
```bash Install theme={null}
curl -fsSL https://agentaos.ai/install | bash
```
```bash Log in theme={null}
agenta login
```
`agenta login` opens your browser to sign in, no API key needed. See [Login](/cli/login) for the details.
A payment link is a reusable, shareable URL. Every visitor who opens it gets their own checkout. Amounts are plain currency units: `49.99` means €49.99, never cents.
```typescript theme={null}
import { AgentaOS } from '@agentaos/pay';
const agentaos = new AgentaOS(process.env.AGENTAOS_API_KEY!); // sk_test_...
const link = await agentaos.paymentLinks.create({
amount: 49.99,
currency: 'EUR',
description: 'Pro plan',
successUrl: 'https://myshop.com/success',
webhookUrl: 'https://myshop.com/webhooks',
});
console.log(link.checkoutUrl);
// → https://app.agentaos.ai/pay/7rr6S9ml4BMp829wV5WeAA
```
```bash theme={null}
curl -X POST https://api.agentaos.ai/api/v1/gateway/payment-links \
-H "x-api-key: sk_test_..." \
-H "Content-Type: application/json" \
-d '{
"amount": 49.99,
"currency": "EUR",
"description": "Pro plan",
"successUrl": "https://myshop.com/success",
"webhookUrl": "https://myshop.com/webhooks"
}'
```
```bash theme={null}
agenta pay checkout -a 49.99 -c EUR -d "Pro plan" --json
```
There's no CLI command to create a reusable payment link yet. `agenta pay checkout` creates a one-off checkout instead. To create a real reusable link, use the SDK, the REST API, or the dashboard's **Catalog → Products** page.
Share the `checkoutUrl` exactly as you'd share a link from the dashboard. The buyer's checkout page is identical.
If you set a `webhookUrl`, AgentaOS POSTs a `checkout.session.completed` event the moment payment clears, with `sessionId`, `amount` (a string, `"49.99"`), and `currency` in the payload. This is the reliable way to react to a payment server-side. See [Handle webhooks](/guides/handle-webhooks) to build a verified handler.
Poll the checkout with `checkouts.retrieve()` (SDK), `agenta pay get ` (CLI), or a `GET` against the REST API. It moves from `open` to `completed` when the payment clears.
Don't trust the `successUrl` redirect as proof of payment. The buyer's browser might close before it fires. A webhook or a status check against the checkout is the source of truth.
## Next steps
Turn this into a recurring plan buyers pay into every month or year.
Build a verified handler so your server reacts to payments automatically.
Move from test mode to accepting real money.
Every parameter, response field, and the checkout-fields feature, in full.